Pinhole Camera Project: How to Turn a Disposable Camera into a Pinhole
6 25 Share TweetIf you are looking for something that will make you busy, here is an alternative pinhole project in addition to a matchbox pinhole, pinhole can and paper pinhole cam. This article is a rough instruction on how to modify a disposable camera and turn it into a pinhole.

In my search for better frame spacing for my pinhole camera, it led me to canibalize my Kodak disposable camera. The camera was a gift from past Christmas and was able to consumate all the 27 shots. I kept the body for memento.
Before that, I’ve been making paper pinhole cameras and it worked fine in terms of capturing the image. But it was a waste of a lot of shots due to the uneven spacing of frames. I thought “Why not count sprocket holes?”. Yes, I did that. It feels more systematic — NOT!
So what I did was cut a small hole on the back of the camera that will expose the sprockets, and then when it was time to wind, I count 16 holes sometimes 17 or 18, until I lose count. Instead of redesigning my masterpiece, I tucked it away and got the disposable Kodak that I kept. Well, if you have this very same camera and interesting in converting it to a pinhole, I’ll share some knowledge on how to. But, before you proceed, please, I won’t be liable for any death, burnt table, fire alarm, or bleeding fingers that might occur during the process. I’m just sharing ideas.
Here are the materials that we will be needing:
- carton cutter
- sewing pin
- aluminum foil, half an inch in diameter
- double sided tape
- heavy duty polyester thread 4 inch long
- long nose plier
- large paper clip
- lit candle
- velcro
- Torx screw driver( for winding film)
KNOCK, KNOCK
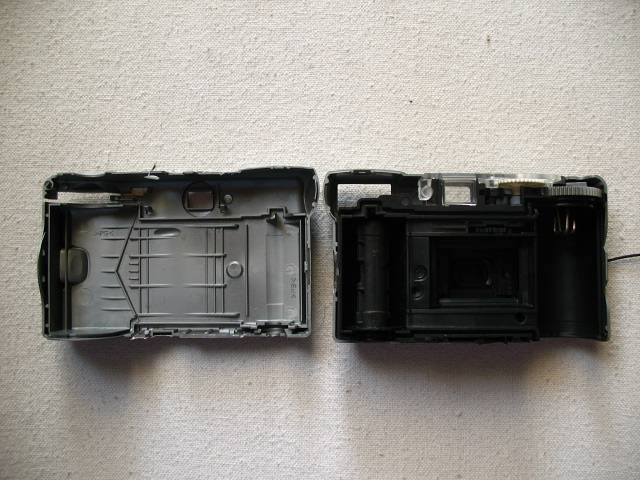
Start by prying it with screwdriver, there is a small notch on the side to lever . Once open, it will expose all the mechanical anatomy, like the flash circuit board, lens,shutter spring, shutter, blank film spool, and film winder.
OUT YOU GO
Carefully remove the flash circuit (Caution! Beware of touching the soldered electronic guts). See this gray thing that holds the lens? Carefully remove that


Once removed, it will expose the lens, small round film for apperture and shutter that swings. Remove the lens. We won’t be needing that.

PUNCH IT AND STICK IT
The black thing is where we need to stick the alluminum foil with a double sided tape. Put a small portion of tape, excluding the center of the foil. And dont forget to punch a pinhole on the alluminum, then center it. I did use a sewing needle but I don’t have the mathematical computation on what needle size to use. Try experimenting on it.


Make a hole on the front cover. Refer to the picture on where to insert the thread so that we can manually toggle the shutter. Tie or hook the thread on the shutter on this part and the other end of the thread then, attach it to the velcro. The other part of the velcro goes to the back cover, this will lock the shutter.


The orginal winder looks like the one on the photo, grab the carton cutter and carefully remove the serated part . This is where we need to insert the paper clip. Heat up the paper clip with a lighted candle, so that it can easily slide thru the plastic. Form it as seen on the image, the bended paper clip will hold the film spool. Put everything into place, I hope didn’t miss out anything, that’s it! Load the film and test.


LOCK & LOAD
Loading film, we will be needing the torx screw driver. Hook the film on the blank spool, on the bottom, stick the torx driver and wind the film counterclockwise once you feel the tension stop. That is the sign you fully wound the film. Don’t forget to zero the film counter by turning the film sprocket gear .
Hit: There’s a film counter, no light leaks, and compact.
Miss: Not available in square format, nowhere to put tripod.
Check out some of the results:


Please share your comments and results also!
written by iloveyousummer on 2012-05-07 #gear #tutorials #pinhole #tipster #disposable-camera #handicraft #camera-modification #pinhole-project #hacking-disposable-cam #pinhole-tipster


6 Comments