360° Pinhole Fun with the Panopticam
9 37 Share TweetWant to try something different for this years’ World Pinhole Photography day? Why not make crazy scrambled 360° panorama pinhole photos? Find out how in this tipster!

I really like the Spinner 360, and I also really like pinholes. So, I had the idea of combining the two and making a 360° panorama pinhole, by making several pinholes around a round camera. As soon as I had thought of this, I realized it wouldn’t work like this. Optics, you know…

Still, why let reality hold you back, right? I still wanted to see what the result of my brainfart would be, so I made my 360° camera anyway.
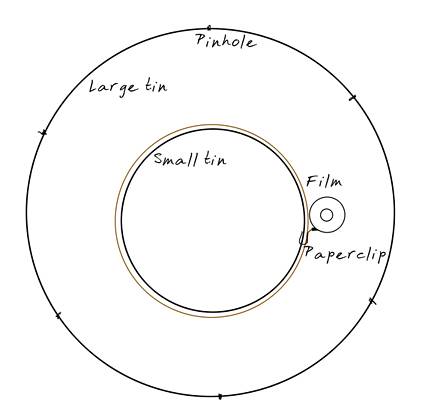
Start out with two cookie tins, a large one, and a smaller one that fits into the large one.

Around the large tin, make six evenly spaced holes. I gathered six would me the appropriate amount of exposing the entire film without too much overlap. The tin opener on my pocket knife did a good job making some holes. Afterwards, give every hole a good whack with a hammer to flatten stray bits of metal.

Next, spray paint the inside of the large tin, and the entire small tin black to reduce reflections inside the camera.

Add a pinhole behind every hole. Six bits of black tape will become shutters.


Finally, kit the small tin in the middle of the large tin.

I baptized my design Panopticam.

To load the camera, go inside a darkroom or changing bag and wrap a length of film around the smaller tin. Fasten with a large paper clip. I simply cut off a piece of film, since I do my own processing. You could sacrifice a few degrees of field of vision and keep your film intact. This way you won’t antagonize your lab people too much I guess. I leave it up to you how you expose the other half of you film then…
To use it, place the panopticam on a steady surface, and one by one remove and replace the shutters. Staying in one spot yourself will mean you’ll be in the picture (several times even). If you want to avoid this, walk around and stay on the far side of the open pinhole. Also, not removing the shutter-tape all the way may result in unexposed bits of film.


written by stratski on 2013-04-22 #gear #tutorials #pinhole #camera #360 #tipster #pinhole-panorama #requested #pinhole-masters-and-magic #pinhole-tipster #round-panopticam-panopticon #panorama-tipster


9 Comments